Once inside the program, click the “Upload Photo” button and choose the blank file from
your hard drive. When
your file has been uploaded into Picnik, you will see it (although barely, because it’s a white image on an almost-white background) in an interface that has five tabs across the top. Choose the “
Create” tab.
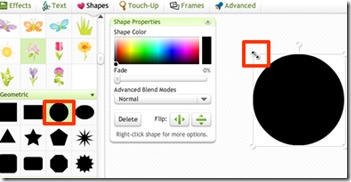 Once inside the “Create” tab, the button you will use the most will be “Shapes.” (If you want to add text to your clip art, you’ll also eventually want to use the “Text” button too.) To begin designing your own clip art, choose “Shapes” and then scroll to see all the available images on the left. Keep in mind that all the images in black can be altered to appear in any color, so at this point all you’ll care about is choosing a shape. Click on an image to insert the shape onto your white “canvas” .jpg, then drag the corner with your mouse to make it the size you want. (See the image above.)
There are a variety of Picnik features you can use to alter your clip art. They require a little getting used to, but once you’re familiar, you’ll probably love playing with them. Here are some of the main features:
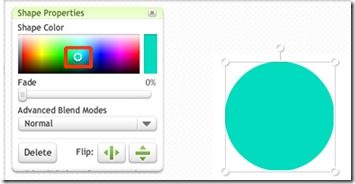 |
| Change colors by moving the white circle that appears on the color spectrum. |
|
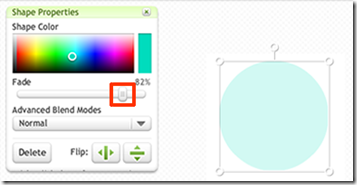 |
| “Fade” the color by sliding the Fade bar. This not only mutes the color, it allows it to “float” over other colors and create layers. (See the butterflies and bird clip art above for examples.) |
|
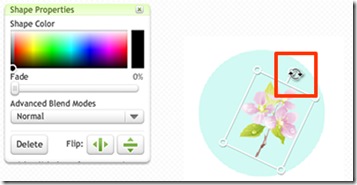 |
| You can insert an image on top of another image (in this case, a flower on top of a circle) and then rotate it. To rotate, hover your mouse over the circle that sticks out at the top of the image. When a circle with two arrows appears, move your mouse to rotate the image in the direction you want it to turn. |
|
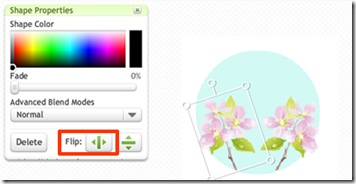 |
| To create a mirror image, as I did with the flower above, just add another flower, then click the “Flip” button on the left. You can also flip vertically by clicking the “Flip ” button on the right. |
|
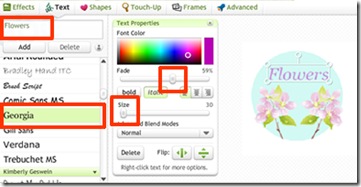 |
| To add text to your image, click the “Text” button at the top of the “Create” screen, then type in the word(s) you want. Then, choose a typeface by clicking on it and size the type by sliding the “Size” bar. You can also fade the text color by sliding the “Fade” bar. If you want your text to appear on two or more rows, you’ll have to go through this process separately for each row. |
|
 Once inside the “Create” tab, the button you will use the most will be “Shapes.” (If you want to add text to your clip art, you’ll also eventually want to use the “Text” button too.) To begin designing your own clip art, choose “Shapes” and then scroll to see all the available images on the left. Keep in mind that all the images in black can be altered to appear in any color, so at this point all you’ll care about is choosing a shape. Click on an image to insert the shape onto your white “canvas” .jpg, then drag the corner with your mouse to make it the size you want. (See the image above.)


No comments:
Post a Comment